Thoughts on programming, web development and design.

Circuit Board

Category: JavaScript Page 1 of 3

JavaScript

Simple Image Gallery with FlexBox and Popup Modal

Lots of websites have image galleries. You’ll see them on news sites, e-commerce and blogs. They vary in size and shape. You can build them with HTML and CSS. If you want more functionality, you can add JavaScript to add a popup modal. Or Lightbox effect.

Image Gallery with Pop-Up

Make Your Own Gallery

  1. Gather 8 or more images
  2. Write the HTML code to structure your gallery
  3. Add CSS to style the gallery
  4. Write JavaScript to show and close the modal

1. Gather Your Images

An image gallery is incomplete without images. You can use your own photos or download Stock Photos. For this project, I used photos I downloaded for my blog. My favorite Stock Photo sites are:

2. Write the HTML Code to Structure the Gallery

Structuring the code is an important step. I used the HTML elements figure and figcaption to layout each image.

<div class="gallery">
          <figure>
            <img src="images/close-up-of-motherboard.jpg" alt="Motherboard" onclick="openModal(this.src)">
            <figcaption class="text-center caption-text">
              Motherboard
            </figcaption>
          </figure>
</div>

3. Add CSS to Make Look Like a Gallery

With CSS, you can arrange your images in a grid-like format. FlexBox allows you to arrange elements in a flexible grid.

.gallery {
    display: flex;
    flex-wrap: wrap;
    gap: 1em;
}

The HTML elements made it easy to create a card design. Where the image is on top and description on the bottom half. This is also a common design pattern in image galleries.

4. Write JavaScript to Show and Close Modal

I wanted to have the image popup in a modal or Light-box when I clicked on it. A Light-box dims the rest of the page. Places the selected image on top of the page. It includes an ‘X’ button to close. I used JavaScript to open and close the modal.

function openModal(src) {
    let modal = document.getElementById('modal');
    let modalImg = document.getElementById('modal-img');
    modal.style.display = 'flex';
    modalImg.src = src;
}

function closeModal() {
    let modal = document.getElementById('modal');
    modal.style.display = 'none';
}

Making It Responsive

FlexBox changes the grid to a column on mobile devices. If you don’t size your images correctly, they can create performance issues. And display incorrectly on mobile devices. I used CSS to make the images fit.

img {
    max-width: 100%;
    vertical-align: middle;
    height: auto;
  }

Summary

Image gallery are simple to make. You can use them to showcase photos or open recipes and news stories. How you build them depends on the purpose that you need. This pop-up modal could be better by adding functionality to scroll through each of the images. An update for a later version.

Related Articles On Programming Apps

Creating a simple weather app with Open Weather API

Updated on January 31, 2025

How do you get the weather? You could use an app or create your own. First, you need a way to get weather data. You can use an Application Programming Interface to get the data that you need.

Creating a simple weather app with Open Weather API

Where can you find APIs to use in your projects? Try ProgrammableWeb. It is an API directory that lets you find the right API for your project. I found a weather API called Open Weather. Open Weather allows you to get the current weather data, hourly or daily forecast and more.

With Open Weather, I created a simple weather app. It gets the current temperature, daily forecast (highs and lows) and weather conditions. Then, it tells you if the weather was right for riding a bike.

Getting Started

Before writing any code, I looked at Open Weather’s documentation. It explains how to use their API. They include examples using different programming languages like JavaScript. These examples are helpful were helpful to learn what I could do with the API.

On their examples’ page, I found Weather.js. Weather.js fetches data from Open Weather for you. It makes it easy to get weather information from Open Weather.

Building the App

Before building the app, I researched other weather apps to get an idea of what I wanted mine to look like. Then, I sketched out an idea on paper.

I chose to use HTML, CSS and JavaScript. Since I am familiar with Bootstrap, I used it as well. I built my prototype with Bootstrap’s starter template. Then, I wrote my own JavaScript file to fetch data from Open Weather using Weather.js.

Open Weather has weather icons. Weather.js doesn’t use those icons. I looked at the JavaScript and wrote code to get the icons.


Weather.Current.prototype.icon = function () {
  return this.data.list[0].weather[0].icon;
}

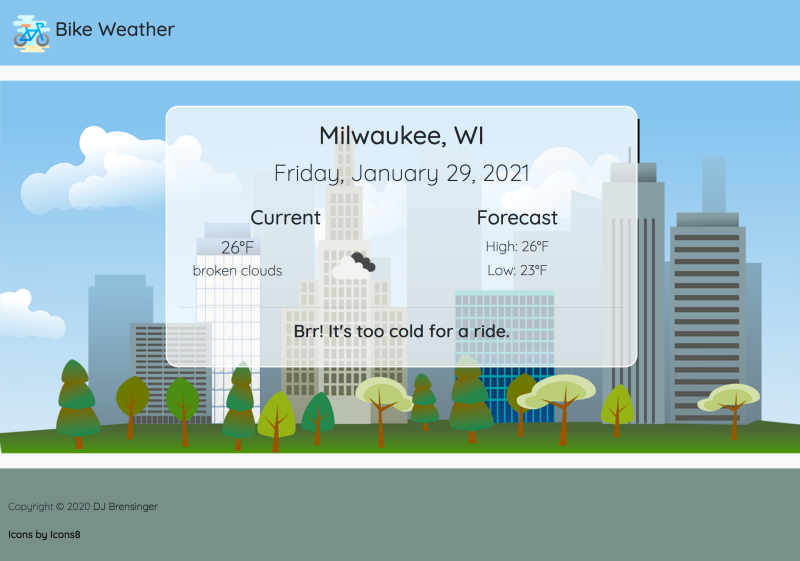
Now, my app shows the current and forecast temperatures, weather icon and conditions.

Bike Weather App Screenshot

Why update?

The version of Bootstrap was old. I wanted to add a feature to get the visitor’s location and display where they are from. It would get the weather forecast for their location. Instead of getting the weather for Milwaukee, WI.

Changes to Bootstrap

The previous version had a feature called Jumbotron. Bootstrap 5 has dropped this component. You can use Bootstrap’s utilities to recreate the look. The layout is a bit different from the original.

Bike Weather Banner

To display the forecast, I used Bootstrap cards. Then, I used FlexBox to make the cards the same height. Bootstrap has a helper to create a sticky footer.

Reverse Geocoding

One option to get your local weather is to use the City and State. In the first version, I hardcoded it. Open Weather has another API for getting your browser’s location. You can do a reverse geocode lookup. HTML has a utility for getting the users location.


function getLocation() {
    if (navigator.geolocation) {
      navigator.geolocation.getCurrentPosition(function(position){
          const longitude = position.coords.longitude;
          const latitude = position.coords.latitude;
          const geoURL = "http://api.openweathermap.org/geo/1.0/reverse?lat=" + latitude + "&lon=" + longitude + "&limit=1&appid=" + Weather.APIKEY;
  
          fetch(geoURL)
            .then(response => response.json())
            .then(data => {
              let cityName = data.map(a => a.name);
              let state = data.map(a => a.state);
              document.getElementById("location").innerHTML = cityName + ", " + state;
              console.log(data);
            })
            .catch(error => {
              console.error('Error fetching data:', error);
              document.getElementById("location").innerHTML = "Milwaukee, Wisconsin";
            });
        })
    } else {
        document.getElementById("location").innerHTML = "Milwaukee, Wisconsin";
    }
  }

By getting the location and doing a reverse lookup, I was able to modify the code. It now gets the forecast based on the user’s location. In web development, updating the code to a new version helps you to develop better solutions. Sometimes updating the CSS framework helps you to build a better user experience.

Articles on Programming Apps

Resilient Web Tips

Whether you use a computer, phone, table or some other device to access the Internet, you expect it to work. Sometimes things can break. Your connection is slow. Images don’t load. They are using a third-party tool that is having their own issues with the Internet. What can you do? Wait. Try again. Come back later to see if they fixed it.

The Internet provides information to users. By allowing them to use, whatever tools they wish. This feature makes the web resilient or fault tolerant.

What is a resilient website?

Being fault tolerant or resilient is part of the how the web works. HTML and CSS are the simplest tools for building a website. If errors are in either the HTML or CSS, the browser skips the errors and loads the page anyway. It may not look the way you want, but people can read the information.

Other programming tools like JavaScript don’t have built in fault or error tolerance. To make your code more resilient, you have to handle errors and missing information.

What can you do?

1. Start with the basics

Use HTML and CSS. HTML is the foundation of the web. You can build a website with HTML only and have it work. CSS allows you to use new features and older browsers ignore what they don’t understand. The more things we add to our web apps, the more they affect user experience. site performance and accessibility.

2. Pick the right framework for the job

JavaScript can enhance the user experience. It can also slow the site performance down. JavaScript Frameworks allow you to build things that you can’t using HTML and CSS. Before you decide to use a framework, you need to ask if you really need it. Or can you use Vanilla JavaScript instead? Consider adding less to your next project.

3. Prevent errors and make them easy to fix

Lot of things can break on the web. Your network connection fails. You clicked on the wrong thing. Or something else breaks behind the scenes. Web developers can build their web apps to prevent errors and make them easy for the user to fix. When you use JavaScript, you need strategies for making a resilient UI. Callum Hart shows you how to build a resilient JavaScript UI.

Where can I learn more about making resilient websites?

Jeremy Keith wrote Resilient Web Design. A book that gives you ideas and approaches on how to build a more resilient web.

Getting Started with JavaScript Accessibility

Accessibility means making your content as available to as many people as possible. You don’t know who visits your content. What browsers they use or how fast their internet connection is. You can build an accessible website with JavaScript You need to keep these considerations in mind.

Getting Started with JavaScript Accessibility

Image by Daniel Agrelo from Pixabay

JavaScript can be necessary

Sometimes, a no JavaScript solution may work. Other times, you may find that JavaScript helps to improve accessibility. It depends on what you want to do. Sara Soueidan wrote about her experience with building a tooltip without JavaScript. She found that it was harder than she thought.

Many people use a keyboard to surf the web. To navigate by keyboard, you jump from one focusable element to the next. You can start by using the tab key to move from one element to the next.

Which elements are focusable? HTML has interactive elements with built in focusability. Elements like text fields, buttons and select lists. You can navigate them by keyboard automatically.

Sometimes, we use HTML elements like <p>, <h2> or <div> to create custom interactive components. If you don’t make these elements focusable, this creates problems for keyboard users. The tab index attribute solves this problem by making a non-focusable element focusable.

Use the right amount of JavaScript

The problem starts when you rely on too much JavaScript. HTML and CSS can do a lot of things that you used to need JavaScript for. Now, you can use HTML to build your content and supplement with JavaScript.

Use the <button> tag to create buttons. You can use <div> or <span> tags to recreate the functionality of a button. When you choose to do this, you have to write extra code to mimic the behavior of a button. It is easier to use the button tag when you need a button.

Want to know more?

Use the Accessibility Developer Guide for best practices on creating accessible websites. Or JavaScript Accessibility Best Practices.

Image by Daniel Agrelo from Pixabay

Making a JavaScript Quiz

People like to take quizzes for fun. Making a JavaScript quiz can be a fun challenge. Pick a topic, collect questions and build the quiz app. You can write one in any web development language you prefer. I wanted to create one in JavaScript.

What do you need to create a quiz in JavaScript?

  • A quiz topic. I love to eat chocolate. Chocolate is a fun quiz topic. I compiled a list of questions on chocolate.
  • A web app. I chose to build it using HTML, CSS and of course, JavaScript.

Other requirements

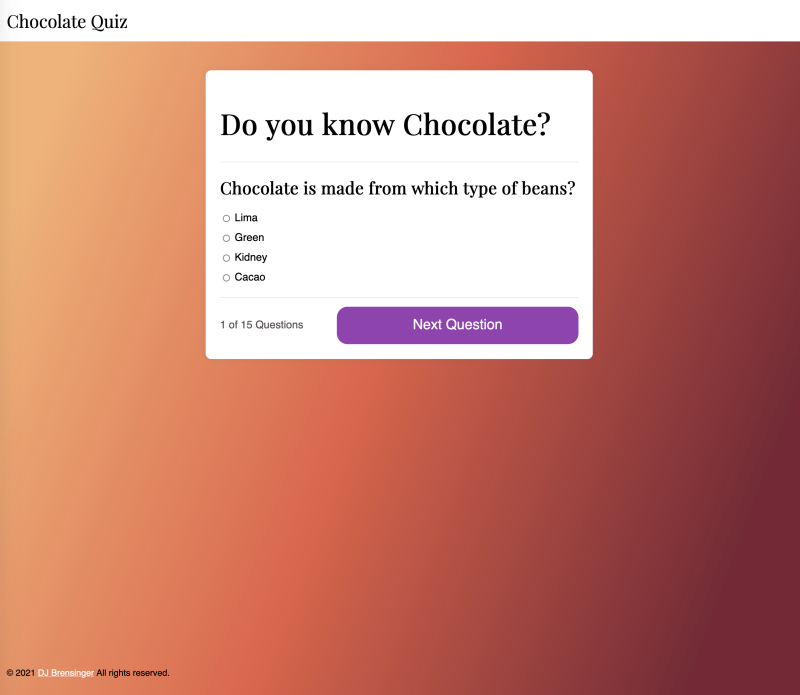
I wanted to use FlexBox for the layout. Plus a counter that shows you what question you are on. I included a photo of chocolate as well.

Chocolate Quiz showing first question

Building the app

The structure for a quiz is simple. It should display a question, a list of answers and track the number of questions that you get right. Then, it shows you summary of how well you did at the end. Plus, it should give you the option to try again.

I started with a simple quiz tutorial and modified it. First, I edited the code to include my questions on chocolate. Then, I looked at a quiz example with a timer and modified my code to add question counter.

Finally, I updated the code to include the chocolate photo into the results. It required adding one line of code.

<img src="images/60-seconds-of-love-sr2QGGnzy8k-unsplash-700.jpg" alt="amul chocolate" class="quiz-image" />

I wanted to add a sticky footer to the bottom of the web app. The web page uses FlexBox. I need to modify the layout to create the footer using FlexBox. CSS-Tricks’ FlexBox option fit well with the app design.

CSS Gradients

I wanted to use a gradient for the background. You can either use a CSS gradient generator to create it. Or use one created by designers. Gradient Hunt lets you choose from a selection of pre-made gradients.

What to do differently

A quiz on chocolate needs more photos of it. The design would need to show more chocolate as you move through the quiz. Next, I would like to show chocolate facts with each question. Each question has to have four answers; no true or false. I would change it so I can add true or false questions.

If you like chocolate and want to take a quiz, try out this Chocolate Quiz.

Page 1 of 3

Powered by WordPress & Theme by Anders Norén