Curiosita Labs

Thoughts on programming, web development and design.

Circuit Board

White space in UI Design

Every element that you use in your UI needs special attention. You carefully pick out the colors, graphics, photos and fonts. Each item is chosen for how it fits into the design. You create a design that carefully balances all of these elements. Have you considered how you use white space?

White space in UI Design

What is white space?

White space is the space between elements. It is intentionally left blank or empty. White space or negative space is the space between columns, graphics, text and other elements. You leave these areas untouched to help make your design easy to read and use.

Where can you use white space?

  • Photos, graphics or any visual element: By adding white space around your visual elements, you can make them stand out. Too little space around them and your design may look cluttered. Too much and it may look empty. You need to play with the space to see what works.
  • Navigation menus: Your visitors use the navigation menu to move through your design. Tinker with changing the spacing between menu items and text.
  • Headlines: They help guide people through your design. Increase the space around each headline. More space around your headlines makes them stand out and help people to understand how to use your design.
  • Content or copy: Not enough space between paragraphs or lists can make them difficult to read. Increasing the space around paragraphs or between characters can help to make it easier to scan and read.
  • Columns: Margins or spacing defines the borders of a column. Use margins and padding to give your columns more definition and breathing room.

As a design element, white space doesn’t have specific rules about when and where you should use it. You have to experiment with spacing to learn what works best. White space is a tool that you use to help make your designs more readable and easy to use. Isabella Morris on Usablity Geek talks about how to use white space to increase usability.


TOP 5 Reasons for Switching to TypeScript

If you write front-end code, you have built a website using HTML, CSS and JavaScript. JavaScript is popular because it is easy to code and flexible. As your website add more features, you may noticed that your JavaScript gets more difficult to add new code. JavaScript doesn’t scale very well. To deal with this, you may have switched to another framework like Node or Angular JS.

Top 5 Reasons for Switching to TypeScript

TypeScript by Microsoft helps you to write JavaScript that scales. With TypeScript, you can write it and compile it into JavaScript. Your compiled code will run on any browser or JavaScript framework that supports ECMAScript 3 or greater. When you write valid TypeScript, it compiles into valid JavaScript.

Top 5 Reasons for switching to TypeScript

At the Milwaukee .Net Users Group, David Pine explained the 5 reasons why you should switch to TypeScript.

5. Compatibility

TypeScript is compatible to ECMSScript 3 and newer.

4. Tools

You can write TypeScript using popular coding tools like Visual Studio products also support TypeScript.

3. Open Source

TypeScript is open source. It is being developed on GitHub. You can look at the specification on GitHub. You can download the source code and post issues right on GitHub.

2. Type System

You can use types that you use in other programming languages like:

  • Classes
  • Interfaces
  • Abstract Classes
  • Namespaces

1. Compilation

“If it compiles, it is one step closer to working code.” – David Pine

TypeScript compiles into simple, clean JavaScript. Valid TypeScript is also valid JavaScript. With the compiled code, you can run it in any browser.

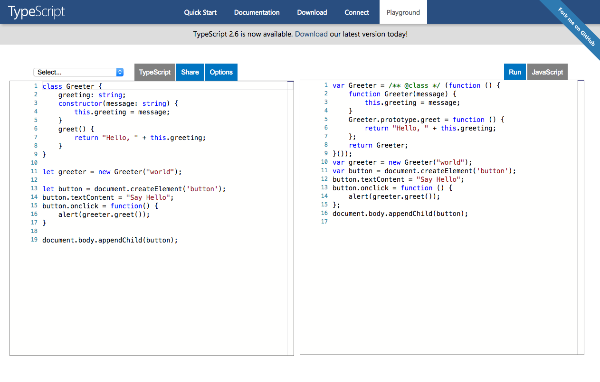
Want to see TypeScript Compiled into JavaScript?

You can go to Playland and see the TypeScript compiled into JavaScript.

TypeScript Playland Screenshot

JavaScript is every where on the web. As a developer, you have probably used and supported it in your projects. TypeScript helps you to write code using programming features that developers in other languages are used to. It creates compatible, clean JavaScript while allowing you to use the tools that your already have.

Building with a Headless CMS

Have you considered using a headless or decoupled CMS? Most websites are build using a traditional CMS. A traditional CMS gives you a way to store data, a UI to input the data and ways to display the data. You may have used a traditional CMS like Drupal or WordPress to build your website.

Building With A Headless CMS

What is a headless or decoupled CMS? The front end and content management system are separate from each other. Headless and Decoupled as similar but they are not the same. A Headless CMS manages the content and waits for the front end to do something with the content. With a Decoupled CMS, it prepares the content for delivery and figures out how it will present your content to a specific device or environment.

Why use a Headless CMS?

  • You are building a website or app that uses a framework like Angular JS, React or VueJS
  • You want to build a website with a Static Site Generator like Jekyll or Gatsby
  • You are creating a mobile app
  • You are creating content for use in different places

Where can I find a headless CMS for my next project? Headless CMS maintains a list of JAMStack content management systems. Or you can experiment with a static site generator.

What if you want to update your existing CMS to use as headless CMS?

If you are using WordPress, you have the option of using it as a headless CMS. You can use WordPress to store the content and display it using an API.

You are not required to use PHP you can use whatever language you want. JC Hiatt explains how to use react to create a headless WordPress site.

If you don’t want to update WordPress, you can use Cosmic JS. It lets you build your next modern web app with any programming language that you want.

When to use a headless CMS?

It depends on your needs and project. You may want to use a traditional CMS when you don’t have a development team and need a website that is easy to maintain. Use a headless or decoupled CMS when you have a development team and you want to create a custom interface for use with more than a website.

Improve Your UX with Microcopy

What is microcopy? It is the smallest piece of content on your website or app. Microcopy can be text-based or visual. Text-based includes buttons, calls to action, error messages and forms. Visual microcopy focuses on images and videos.

Improve Your UX With Microcopy

Microcopy needs to be easy to understand, short and draws the user in. It should guide the user and help them to understand how to use your website or app.

What can you do to improve your microcopy?

Talk to your users like a person

Does your copy sound conversational or like a marketer? If it sounds like a marketer, change the words. You want to write copy with the same words that your users use.

Use copy to guide your users

Write short and helpful sentences, not paragraphs. If you need more than 8 words to explain what the users need to do, rewrite it.

Explain errors

Nothing is more annoying than confusing or cryptic error messages. Let your users know how to fix the problem. Take the time to write simple and easy to understand error messages.

Minimize User Worries

Your microcopy should anticipate user questions. Use clear labels and descriptions in forms to minimize data entry problems. Let them know why you require certain pieces of information.

Know when to user your Brand voice

Your microcopy can use your brand voice. The trick is to know when to use it and when not to. Some situations require clear and simple language.

Want examples of good microcopy?

Goodmicrocopy.com, curated by Richard Sison, has a collection of clear, concise and sometimes quirky microcopy.

Screenshot Good Microcopy.com

When you create a website or app, the smallest bits can make your users’ experience a good one. To make their experience a good one, remember to design the smallest bits of microcopy.

4 Items to Include in a Development Tutorial

Writing a tutorial is a good way of sharing how you solved a programming problem. Programmers use tutorials to learn how to write the code for themselves instead of depending a all ready written code. Tutorials can be a quick way to learn how to do something. What do you need to write a good tutorial?

4 Items to Include in a Development Tutorial

4 Items to include in a tutorial

  • Step by step instructions
  • Screenshots
  • Code snippets
  • Version of software or tools

Step by step instructions

By providing step by step instructions, you can break the tasks down into easy and understandable pieces. Your readers will be able to follow what you learned and do it themselves.

Screenshots

Sometimes, steps aren’t enough. You need to show your reader what happens. A screenshot can show you what to expect, look for or do. A good screenshot compliments what you want your reader to do next.

Code

Make your code samples easy to copy and to understand for new and experience programmers. You can use a tool like CodePen.io to include your code. Or use one of these 4 Ways to Add Code Snippets.

Version of Software or tools

Your software and tools change over time. New versions come out. Let your reader know what version of the software that you were using.

What about video?

Not a writer? You can record a video tutorial instead of writing one. Gregg Pollack on Hackernoon collected 10 Tips to create the best worst programming tutorials. If you prefer video, keep these tips in mind so your video tutorial isn’t the worst.

Summary

Writing a tutorial can help you to understand a new concept or programming problem thoroughly. Use these items to help explain what you have learned. When you teach others, you learn new things about the concept that you are teaching.

Page 21 of 52

Powered by WordPress & Theme by Anders Norén